12/14/2010

Tech Tip Tuesday ... Lit2Go


I'm excited to show you a site with a great collection of stories and poems that you can use in your classroom, in the computer lab, or just about anywhere with an mp3 player! Florida's Educational Technology Clearinghouse has put together this great collection.  Each reading passage can also be downloaded as a PDF or printed for use as a read-along or as supplemental reading material for your classroom. 

Lit2Go is a free online collection of stories and poems in Mp3 (audiobook) format. You can:
  • Download the files to your Mp3 player and listen on the go,
  • Listen to the Mp3 files on your computer,
  • View the text on a webpage and read along as you listen,
  • Print out the stories and poems to make your own book.
    You can search for reading passages by title, author, keyword, or even reading level (Reading Levels are primarily determined by Microsoft Word (the Flesch-Kincaide Grade Level score), but they have also consulted other educational sources to help better determine the reading levels.


    I personally prefer just browsing the titles, so all I did was scrolled down to the very bottom of the screen and clicked on Titles. When you select a title (books are in italics, the other titles are fables, speeches, documents, poems, fairy tales, etc.) you will see information about the passage that includes its reading level, origin, genre, and Sunshine State Standards (remember, this site was created and is maintained in Florida!). Scroll down to find the audio and text files.

    Did you see any passages you're going to use with your class? Did you see any you want to download and listen to while on a long car trip this month? What other sites like this do you use? As usual, your comments are always welcome.


    12/07/2010

    By Popular Demand ... Email Signatures


    I've received many questions recently about creating and using email signatures. I'll try to give you a few suggestions on how you can create your own super-cute signatures and how you can get them to work in Groupwise.

    There are really only three steps ...
    1. Decide what you want your signature to say and if you want to include a graphic.
    2. Create your signature in some sort of image editor (I will show you using my favorite FREE online image editor, Pixlr, but you can use the editor of your choice.)
    3. Set up your Signature in Groupwise.  Now that we are using Outlook, the directions have changed!
    Step 1 - Planning Your Email Siggy
    You should definitely include your name, but what else? Perhaps you should include your campus name, job title, phone number and extension? There's no need to include your email address since this will be attached to an email from you, but you could include the URL for your class or campus website.
    Many people like to include pictures or graphics. Try to keep them relatively small and not too distracting. You will also want to keep them education-friendly!
    Click here to see several blank Email signature files. You can download them to your computer and use them to personalize your very own siggy!


    Step 2 - Create Your Siggy
    • Go to Pixlr
    • Click Open Image Editor 
    • Click Open image from computer, then browse to find the signature file you saved
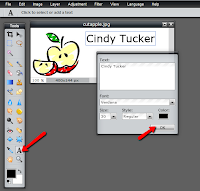
    • Click the Text tool, click into the body of the signature file. Enter and edit your text in the pop-up box.
    • To move the text, click the Move tool (top, right tool on the tool palette), and then click and drag your text.
    • Add additional text boxes for the other information on your signature
    • The Layers palette (on the right side of the screen) shows you each different "layer" or item you add to your Pixlr workspace. If you need to select a specific part of your design, select it by clicking on the layer in the layers palette.


    • When you are finished, File > Save 
    • Stay on the My Computer Tab, give your signature a Name, leave it set to JPEG, and click OK

    Step 3 - Set Up in Groupwise  Check out this post about how to set up your signature in Outlook 2010!
    • In Groupwise Client, Click Tools > Options, then double-click the Environment icon
    • On the Signature tab, click New
    • Name your new signature
    • Click the double-arrows at the far right side of the toolbar across the signature "box"

    • Choose Insert Picture, then Browse to find your saved signature image. Alternate Text, Layout, and Spacing information is optional. Click OK.

    • Designate whether to automatically add or prompt before adding your signature. (I suggest "prompt before adding" because you probably don't want to use your signature on every email.)
    • Click OK to set this as your email signature
    Helpful Tips
    • After you set it up, send an email to yourself (your school address) to see if it works.
    • You may want to include your class website address. (If you don't already have a "Friendly URL", please contact your IT so we can set one up for you. A Friendly URL is one that doesn't contain a long string of numbers ... for example, my website address is www.emsisd.com/ctucker
    • If you don't see your signature, check to make sure you are viewing the email in HTML. (Tools > Options > Environment, then click on the Views tab. Select HTML option for the Default Compose View & Font AND the Default Read View & Font)
     

    Blog Template by YummyLolly.com