Blank Email Signature Designs
I've created some "blank" designs that you can use to create your own email signatures. It is actually an image on a white rectangle that will be a good size for your siggy. The graphics I have used are from free clip-art sites or the Microsoft Clip Art Gallery.
To use one of these, right-click on the image, choose Save As, and save it to your computer. I've included the directions below on how to create and use the Email signature. It is the same information that was posted on the Dec. 7 Blog entry.


I've received many questions recently about creating and using email signatures. I'll try to give you a few suggestions on how you can create your own super-cute signatures and how you can get them to work in Groupwise.
There are really only three steps ...
- Decide what you want your signature to say and if you want to include a graphic.
- Create your signature in some sort of image editor (I will show you using my favorite FREE online image editor, Pixlr, but you can use the editor of your choice.)
- Set up your Signature in Groupwise.
Step 1 - Planning Your Email Siggy
 Step 2 - Create Your Siggy
You should definitely include your name, but what else? Perhaps you should include your campus name, job title, phone number and extension? There's no need to include your email address since this will be attached to an email from you, but you could include the URL for your class or campus website.
Many people like to include pictures or graphics. Try to keep them relatively small and not too distracting. You will also want to keep them education-friendly!
Click here to see samples and several blank Email signature files. You can download them to your computer and use them to personalize your very own siggy!
 Step 2 - Create Your Siggy
- Go to Pixlr
- Click Open Image Editor
- Click Open image from computer, then browse to find the signature file you saved
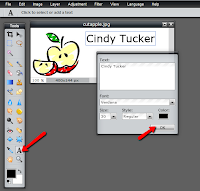
- Click the Text tool, click into the body of the signature file. Enter and edit your text in the pop-up box.
- To move the text, click the Move tool (top, right tool on the tool palette), and then click and drag your text.
- Add additional text boxes for the other information on your signature
- The Layers palette (on the right side of the screen) shows you each different "layer" or item you add to your Pixlr workspace. If you need to select a specific part of your design, select it by clicking on the layer in the layers palette.

- When you are finished, File > Save
- Stay on the My Computer Tab, give your signature a Name, leave it set to JPEG, and click OK

Step 3 - Set Up in Groupwise
- In Groupwise Client, Click Tools > Options, then double-click the Environment icon
- On the Signature tab, click New
- Name your new signature
- Click the double-arrows at the far right side of the toolbar across the signature "box"

- Choose Insert Picture, then Browse to find your saved signature image. Alternate Text, Layout, and Spacing information is optional. Click OK.

- Designate whether to automatically add or prompt before adding your signature. (I suggest "prompt before adding" because you probably don't want to use your signature on every email.)
- Click OK to set this as your email signature
Helpful Tips
- After you set it up, send an email to yourself (your school address) to see if it works.
- You may want to include your class website address. (If you don't already have a "Friendly URL", please contact your IT so we can set one up for you. A Friendly URL is one that doesn't contain a long string of numbers ... for example, my website address is www.emsisd.com/ctucker)
- If you don't see your signature, check to make sure you are viewing the email in HTML. (Tools > Options > Environment, then click on the Views tab. Select HTML option for the Default Compose View & Font AND the Default Read View & Font)