12/14/2010

Tech Tip Tuesday ... Lit2Go


I'm excited to show you a site with a great collection of stories and poems that you can use in your classroom, in the computer lab, or just about anywhere with an mp3 player! Florida's Educational Technology Clearinghouse has put together this great collection.  Each reading passage can also be downloaded as a PDF or printed for use as a read-along or as supplemental reading material for your classroom. 

Lit2Go is a free online collection of stories and poems in Mp3 (audiobook) format. You can:
  • Download the files to your Mp3 player and listen on the go,
  • Listen to the Mp3 files on your computer,
  • View the text on a webpage and read along as you listen,
  • Print out the stories and poems to make your own book.
    You can search for reading passages by title, author, keyword, or even reading level (Reading Levels are primarily determined by Microsoft Word (the Flesch-Kincaide Grade Level score), but they have also consulted other educational sources to help better determine the reading levels.


    I personally prefer just browsing the titles, so all I did was scrolled down to the very bottom of the screen and clicked on Titles. When you select a title (books are in italics, the other titles are fables, speeches, documents, poems, fairy tales, etc.) you will see information about the passage that includes its reading level, origin, genre, and Sunshine State Standards (remember, this site was created and is maintained in Florida!). Scroll down to find the audio and text files.

    Did you see any passages you're going to use with your class? Did you see any you want to download and listen to while on a long car trip this month? What other sites like this do you use? As usual, your comments are always welcome.


    12/07/2010

    By Popular Demand ... Email Signatures


    I've received many questions recently about creating and using email signatures. I'll try to give you a few suggestions on how you can create your own super-cute signatures and how you can get them to work in Groupwise.

    There are really only three steps ...
    1. Decide what you want your signature to say and if you want to include a graphic.
    2. Create your signature in some sort of image editor (I will show you using my favorite FREE online image editor, Pixlr, but you can use the editor of your choice.)
    3. Set up your Signature in Groupwise.  Now that we are using Outlook, the directions have changed!
    Step 1 - Planning Your Email Siggy
    You should definitely include your name, but what else? Perhaps you should include your campus name, job title, phone number and extension? There's no need to include your email address since this will be attached to an email from you, but you could include the URL for your class or campus website.
    Many people like to include pictures or graphics. Try to keep them relatively small and not too distracting. You will also want to keep them education-friendly!
    Click here to see several blank Email signature files. You can download them to your computer and use them to personalize your very own siggy!


    Step 2 - Create Your Siggy
    • Go to Pixlr
    • Click Open Image Editor 
    • Click Open image from computer, then browse to find the signature file you saved
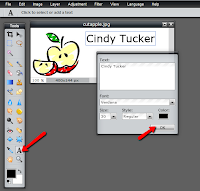
    • Click the Text tool, click into the body of the signature file. Enter and edit your text in the pop-up box.
    • To move the text, click the Move tool (top, right tool on the tool palette), and then click and drag your text.
    • Add additional text boxes for the other information on your signature
    • The Layers palette (on the right side of the screen) shows you each different "layer" or item you add to your Pixlr workspace. If you need to select a specific part of your design, select it by clicking on the layer in the layers palette.


    • When you are finished, File > Save 
    • Stay on the My Computer Tab, give your signature a Name, leave it set to JPEG, and click OK

    Step 3 - Set Up in Groupwise  Check out this post about how to set up your signature in Outlook 2010!
    • In Groupwise Client, Click Tools > Options, then double-click the Environment icon
    • On the Signature tab, click New
    • Name your new signature
    • Click the double-arrows at the far right side of the toolbar across the signature "box"

    • Choose Insert Picture, then Browse to find your saved signature image. Alternate Text, Layout, and Spacing information is optional. Click OK.

    • Designate whether to automatically add or prompt before adding your signature. (I suggest "prompt before adding" because you probably don't want to use your signature on every email.)
    • Click OK to set this as your email signature
    Helpful Tips
    • After you set it up, send an email to yourself (your school address) to see if it works.
    • You may want to include your class website address. (If you don't already have a "Friendly URL", please contact your IT so we can set one up for you. A Friendly URL is one that doesn't contain a long string of numbers ... for example, my website address is www.emsisd.com/ctucker
    • If you don't see your signature, check to make sure you are viewing the email in HTML. (Tools > Options > Environment, then click on the Views tab. Select HTML option for the Default Compose View & Font AND the Default Read View & Font)
    11/30/2010

    10 Minute Mail

    Are you tired of getting all that spam (unwanted email) in your inbox or even in your junk mail folder?

    10 Minute Mail is a site that will issue you a temporary (and I do mean TEMPORARY) email address. 


    Why would I ever need this???

    I'm glad you asked! There are a few different reasons you might need a temporary email address. Maybe you want to sign up for a site which sends a validation email. Give them a 10 Minute Email address, grab the validation email, then check out the site. If it's not something that interests you, no worries ... they don't have your real address!

    You can also use this to sign up for an online service without committing yourself to all kinds of updates, newsletters, and emails that start, "Here's something you might find interesting ..."!


    Okay, now that you're convinced that you need it, here's how easy it really is ...


    You will see your new (temporary) email address

    As long as you keep the window open, you will be able to see any new emails that come to this address (like the validation emails, etc.)

    If you need more time, you can easily request an additional 10 minutes by clicking the link


    11/16/2010

    Tech Tip Tuesday ... Thanksgiving Resources

    Crisp morning air, colorful leaves falling from the tree, students and teachers skipping through the halls ... yep, it's nearly Thanksgiving!

    If you're looking for some great Thanksgiving sites or activities to share with your class this week, today is your lucky day! I've listed many of the educational Thanksgiving sites I've seen. If you know of other great resources, please comment below!

    The First Thanksgiving (from Scholastic) is amazing! There are several short video clips and still images from the Plimoth Plantation. (This isn't a misspelling - this modern day museum chose to spelling Plimoth the way many did in the 1700's.) You'll find the following topics on this site:
    • Voyage on the Mayflower - learn what it was like to live and work on a 17th-century sailing vessel - take the journey and tour the ship
    • Daily Life - compare and contrast the housing, clothes, food, chores, schooling, and games of the Pilgrims and the Wampanoags
    • The Thanksgiving Feast - see a slide show and participate in the Webquest where students can learn about the history of the Thanksgiving Feasts - not exactly the turkey and dressing most of us are anticipating next week!
    • Teaching Resources - be sure to check these out! You will find lesson plans, Readers Theater scripts and read-along stories, all of the multimedia resources (short Plimoth Plantation videos, slide shows of the Plantation, etc.)  You will also find craft ideas, Thanksgiving printables, and clip art.

    WAIT, that's not all ....

    BrainPOP Jr. has a great Thanksgiving that your students will love - check it out! Annie and Mobi share lots of facts about the Pilgrims, the Wampanoag, and the first harvest feast.
    Don't forget that we already have a district subscription to BrainPOP, BrainPOP Jr., and BrainPOP Espanol. When you click to watch the video, select "log in".  If you don't know the usernames and passwords, check with your CTI or email me!


    Let's Say Thanks is a website that allows anyone - students, teachers, administrators, parents, anyone! - to send messages of thanks to our troops serving around the world. 
    Scroll through lots and lots of hand-drawn post cards, choose your saying, and submit - it's easy as that! Be sure to check out the Photo Gallery where you will find pictures of our troops receiving the post cards. Your students may even want to do this at home with their families too!

    If you liked any of these resources or know of others, please leave a comment! Happy Thanksgiving to you all! 


    11/09/2010

    Tech Tip Tuesday ... Word Clouds

    Word Clouds seem to be all the rage right now. If you haven't used them yet with your students, you'll definitely want to start!

    Wordle is the first online site I knew about where one could create a word cloud. You can read more about Wordle on one of my previous posts here

    Another one that looks really promising for our younger students is at one of my favorite sites, ABCya! After entering your text, it's super easy to delete a word, change the font, color, style, etc. One real plus for this site is that you can then save your Word Cloud as jpg to be used on a blog or on an assignment or wherever! Here's a simple one I did with some of the text from this page!

    Another great word cloud generator is Tagxedo. There is a great deal more creative freedom with Tagxedo, as you can tell by some of these examples. The other important difference between Wordle and Tagxedo is that you can actually tag the words in a Tagxedo word cloud so that students can click on the individual words and search for their meanings.


    If these three sites aren't enough for you (and you know who you are), be sure to check out some of these great resources:

    And last, but CERTAINLY not least, is an exciting site that you can use with your kids tomorrow! Guess the Wordle is a site created by Jen Wagner. She creates and uploads a different Wordle each day. Each Wordle has a TOPIC, that your students can try to guess.

         Monday - these are easy Wordles, and all of the words have ONE thing in common
         Tuesday - the topic of these Wordles will be the date of a famous event in world history
         Wednesday - all of the words in this Wordle have TWO things in common
         Thursday - the topic of these Wordles is the title of a book, poem, song, fable, etc.
         Friday - the topic of Friday Worldes will be a famous location

    One more hint for teachers - If you hover over the Wordles on the Guess the Wordle site, you will see the answer!

    Regardless of how you decide to use the Word Clouds, have fun with them and see how excited kids can get about the "wordy" projects. As always, comments are welcome - let us know how you're using one of these Word Cloud Generators or if you know of any others that should be listed here!


    11/08/2010

    ITS Meeting in Birdville ISD

    My colleagues and I had the pleasure of attending the first ITS (Instructional Technology Specialists) Meeting for Regions 10 and 11 today. What a great group of people who all do the same thing, and what a great opportunity to share some of the things we do in our district and [even better] hear about great things happening in our neighboring districts!

    Becky and I presented today about one of our favorite and most popular inservice classes - Tips, Tricks, and Freeibes ... OH MY!!! And yes, we did the "hand motions" each time we said "Oh My", and we got almost all of the other 80-something people in the room to join in the fun! =)

    I learned about so many things today that I can't wait to play with and share with you all! Here are just a few ...
    Oh, and just SO MUCH MORE!

    11/02/2010

    Tech Tip Tuesday ... YouTube Videos in the Classroom!

    What is YouTube?
    Quite simply, it is is one of the most used, most visited and most popular video sharing sites available on the World Wide Web. Unfortunately, if you've spent much time at all on YouTube, you've probably found some inappropriate content. That doesn't mean it's all bad!
    If you've been wondering how you can use YouTube videos in the classroom, this post is for you!

    The Educational Video Library is a new tool that we are using in Eagle Mountain-Saginaw ISD. It allows teachers to show videos from YouTube without the concern about other viewers' comments or recommendations for other videos. All you see is the video!

    When you find a YouTube video that is just perfect for what you're teaching in class right now (of course, which means it is aligned to your curriculum!), all you need to do is submit the video's URL to the Video Library. As soon as it is approved by one of the Instructional Technologists in the district, it will be available to view in district - by you and by any other teacher in the district! 


    You can submit the video directly from the Educational Video Library, but you have to be logged in to a district computer to view the Library. The easiest way to submit a video to the Educational Video Library (and the only way to do this from home) is to use this form. Videos will not appear in the Educational Video Library until they have been approved by one of the ITs in the district, so you may want to email me if you submit a video.


    Download the Video 

    You can also download the video directly from YouTube and save it to use at a later time. In order to use it in the classroom, you will need to save it to a removable flash drive or even save it into your Dropbox folder. Here are a couple of options for saving videos from YouTube:


    ConvertFiles
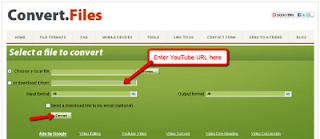
    • Go to ConvertFiles.com, enter the YouTube URL in the "Download from" field, choose an output (I would go with whatever it suggests!) and click Convert.

    • As soon as it's finished, you will get a message with instructions on how to download your video.

    Another option ... Kick it!


    I can hardly believe this works, but it does! When you're at home and find the absolute perfect video, just simply add in the word "kick" in front of "youtube" in the URL.

    The page will re-load, this time with the KickYouTube toolbar towards the top of the page. From the toolbar select the format you want. Next, just Click the Go button on the right side of the toolbar.  When it  changes from "Go" to "Down" right click it and select "Save as.."
    Original YouTube URL was  http://www.youtube.com/watch?v=cg-vV1lYlP0 
    KickTube URL is http://www.kickyoutube.com/watch?v=cg-vV1lYlP0
    There are tons of other video converters or ways you can use YouTube clips in the classroom. If you have a favorite, please let us know!
    10/27/2010

    Classroom Makeover Grant Opportunity!

    Bring some life back into your classroom with the Great American Classroom Makeover. Win up to $2,500 to give your room a little TLC! Plus, when you win—so does your school.
    First place: $2,500 for your class plus $2,500 for your school
    Second place: $1,500 class and $1,500 school
    Third place: $1,000 class and $1,000 school
    Finalists will be notified in December 2010, and the public will decide who is most deserving of a classroom makeover in January 2011. Submit your entry by November 13, 2010!
     
    Click  here to submit your entry!

    Be sure to leave a comment below if you entered the contest - we want to vote for you!   


    10/26/2010

    Tech Tip Tuesday ... Spelling City

    If you teach spelling or vocabulary (and really, who doesn't???) you will definitely want to check out Spelling City

    Spelling City is a free online environment where kids can access their weekly spelling or vocabulary lists, practice their words with online games, and even take practice tests. 

    The super simple way to use Spelling City is to encourage the students to visit the site, they (or their parents) type in their weekly spelling words, and take advantage of the online games and practice tests. Other than letting the parents know about it, this is all you have to do!

    Spelling City is really quite easy to figure out, but if you want a little more instruction, they have several short & sweet videos that can be viewed here. Some of the videos include:
    • Get Started – Demonstrates how a user enters words and takes a test. 
    • Test Results – Explains the information that SpellingCity provides after taking a test. 
    • Custom Sentences - Shows how parents and teachers can add their own sentences!  
    • Student Writing Practice - Explains how to use the Sentence and Paragraph Writing Practice activities. 
    • Handwriting – Details how to create handwriting worksheets using your spelling lists.  
    Teachers, you can create their own accounts in Spelling City and enter the spelling lists yourself. When you sign up, you will want to select your school so that your students can easily find you. After you enter your preferred username, your email, and a password, you will come to a screen that explains the subscription costs. STOP - Don't pull out that credit card yet! Look down in the lower right corner of the screen for the No Thanks, I'm fine with the free version button. 
    The last step of registration will be waiting for you in your email box. Be sure to check your junk mail, because it will most likely go there.  

    What do you think about Spelling City? (Be sure to leave a comment below.)


    10/19/2010

    Tech Tip Tuesday ... Dropbox

    If you've ever been at home and needed a document that was safely stored on your computer at school, OR you've been at school and needing a document from your home computer, Dropbox is for you!

    Dropbox allows you to sync designated files online, allows you to share files with others, gives you access to your files virtually anywhere, and is even available on your smart phone!

    The first thing you need to do is go to Dropbox and watch the little introductory video and then download Dropbox to your desktop.

    In the interest of full disclosure, we do have something like this in district. iFolder is a similar tool that is available in district with your Novell username and password. Here are the reasons I've converted to Dropbox instead of iFolder:
    • Dropbox is easier to install and run on your computer. 
    • You get 2 gb of free space just for signing up - get friends, co-workers, or PARENTS to sign up, and you get additional space.
    • I can get to dropbox on my iPhone (or other smart phones and mobile devices!)
    • I can share documents, pictures, fonts, etc. with anyone - not just district employees. 
    I'm a classroom teacher. Why do I need Dropbox?
    • Easily share documents with other teachers on your team, campus, across the district, or anywhere in the world.
    • Share class newsletters, class pictures, video or audio recordings of your class (with permission, of course). The only people that see it are the ones you have invited - no fear of internet predators.
    • We all know it ... teachers work from home! Instead of emailing yourself that huge document or saving all those pictures to your flash drive that's in the bottom of your purse right now, just save them into Dropbox. You've got access to them from home, from your classroom, from the public library, from the Development Center ... anywhere!
    If you have any questions, concerns, or comments about how we can use Dropbox, please leave a comment. (It's EASY ... give it a try!)

      Tech Tip Tuesdays are Back!

      New school year, new look for the blog ... what do you think?

      As an Instructional Technologist, it is my job to support the teachers, students, and administrators of our district as they use our different systems and programs.

      Do you have a specific request for a type of tool or website that would help you in your classroom? Click the Comments link below and let me know!

      Check back each week to learn about a new website, technology tool, or tip that's sure to keep you wanting more! Please be sure to leave comments about how you're using these tips in your classroom.


      5/24/2010

      Tech Tip Tuesday ... Animoto

      Animoto is one of my absolutely favorite online tools. (I know, I know ... I say that about a lot of sites, but this one is really super cool!)

      In just a few short and easy steps, you can create an awesome end-of-year music video that is sure to amaze your students, parents, co-workers, neighbors, administrators, etc. (it's guaranteed to impress!) You upload the pictures, short video clips, and music. You can even choose music from their own collection. Animoto [magically] analyzes your pictures and music, adds fun transitions, and waa laa ... you've got a music video!


      In order to do a full-length video for FREE, you will need to sign up for an Animoto Educator account. It takes a day or so to get the account created, so be sure to sign up today at  www.animoto.com/education.

      To create your own full-length Animoto, you will need to sign up for a [free] Educator account at www.animoto.com/education. It can take a day or two to receive the email confirmation of your new account, so you'll want to sign up right away.

      Non-teacher-types can create free 30 second videos, but to create full length videos, there is a fee. For educators (that's us!) it's FREE! You will need to reapply for your educator account every six months, but Animoto sends email reminders and it's relatively painless. =) 
      Animoto Ideas for the Classroom (for teachers or students)
      • All About Me project at the beginning of the year
      • Field Trip Presentation
      • Advertisement/Commercial for upcoming school events (carnival, book fair, etc.)
      • Introduce/Conclude a Curriculum Unit
      • Digitial Storytelling
      • Vocabulary Flashcards
      Can you think of other uses? Do you have any Animotos posted to your website? If so, please leave details in the comments so we can check them out!


      5/18/2010

      Tech Tip Tuesday ... Google Calendar

      You probably don't actually need a calendar to tell you what time of year it is right now (we can just feel it, can't we?) but today's Tuesday Tech Tip is all about Google Calendar .
      Google Calendar
      If you haven't jumped on the Google bandwagon yet, this may be just what you needed to get you on board. There are many fantastic Google applications (Google Docs, Reader, Maps, Google Earth, GMail, etc.) but I think Google Calendar may be my favorite.
      Just click the Sign In link in the upper right corner of any google page. Sign in with your Google username/password or click the Create an Account link to create your own Google account.
      Why I Use (and Love) Google Calendar
      1. Access the Calendar Anywhere - I just log in to Google wherever I happen to be, and I have my entire calendar right there! I can access my calendar from my iPhone too ... super cool!
      2. Reminders - If you're like me, you probably have sticky notes all over your desk with little reminders for yourself. Sadly, I usually forget to read the notes! Google Calendar will actually send you SMS reminders to your cell phone, an email reminder, or a pop-up on your computer screen (although you will need to have your Google page open) for your events. Create as many reminders as you need for each event - a week, a day, an hour, 5 minutes ahead of time ... you choose!
      3. Share Your Calendar With Others - You can share with your family, your friends, your co-workers; create private calendars, share with just a select few, or create public calendars. You can also send invitations to events with Google Calendar - even to people who don't have Google accounts! 
      4. Multiple Calendars - I have several calendars of my own, I subscribe to a couple of public calendars, and I even have my co-workers' calendars too. I can color-code each one, and I can easily hide or show any combination of the calendars. It's also super-easy to copy one event on to other calendars.
      5. Adding/Changing Events - This simply couldn't be any easier! Just click into the appropriate date and enter your info. If you enter "meeting at DC @ 2:30", it somehow (perhaps magically) knows that DC is a location and your meeting will likely be from 2:30pm - 3:30pm. If it "guesses" incorrectly, just click it again to edit it. Oops - did the date get changed??? Just click and drag it to the new date (yes, as easy as that!)
      6. Multiple Views - Do you prefer to see the whole month at a time, or is that just a little too overwhelming? Easily switch between calendar views - Day, Week, Month, 4 Weeks, or Agenda.
      7. Repeating Events - Do you need a reminder to complete your lesson plans each week or change the class helpers? (Or maybe change the filter in your a/c unit at home???) You can create an event and set it to repeat weekly, monthly, or always on the 5th of the month, etc.
      8. Tasks - One of the newer features of Google Calendar is the Tasks list. I like to make to-do lists. I like to check off the items I've completed. I am guilty of adding tasks to my to-do list that I've already done, just so I can cross them off! I can use the Task list in Google Calendar to help me keep track of my many, many "to-do's"!
      9. Public Calendars - Of course, you can add "US Holidays" to your calendar, but there are lots of other choices too. Are you a sports fan? You can choose from most Professional Sports teams and see their schedules right on your desktop. 
      10. It's Pretty! - I know, it's kinda lame for a reason, but Google Calendar has pretty colors, a nice layout, and I like it!


      4/26/2010

      Tech Tip Tuesday ... The Hat


      "I'm first!"
      "Pick me, Pick me!"
      "I never get picked ... it's not fair!"
      "My turn!"

      If this sounds like your classroom, then you definitely need to check out The Hat. It's a simple but handy little utility that offers a fun and easy way to automatically determine a random order from a list of any amount of names. You can even use it to pick individual names for raffle and sweepstakes winners, etc. or pick pairs of names for deciding random partnerships, complete with cool animation and sound effects. 
      To load on your computer, follow these simple (one-time) directions:
      1. Click Run, Run, Next
      2. UNCHECK the option to load the Harmony Hollow toolbar, click Next.

        Harmony Hollow Software Toolbar
      3. Accept the User Agreement (after you've read it, of course), click Next.
      4. Click Next, Install.
      5. Click Finish and you're all set!
      Add your students' names by clicking the green button. You can even import them if you have them saved in a text file or copied to your clipboard.
      The Hat
      To select a student, click Shuffle and then Stop. The name at the top of the list is "it!"
      You can save your lists to use again later. 

      4/19/2010

      Tech Tip Tuesday ... PDF to Word


      Digi Know Logo
      PDF documents are fabulous - anyone with (free) Adobe Reader can view PDFs, whether they are on a Mac or a PC. PDFs are often smaller in size and better to upload to websites or send as email attachments. PDFs are typically not editable, which is often a good thing. From time to time though, we may find ourselves needing to edit a PDF. If you've ever been in this situation, you know that it's not the easiest thing in the world ... until now!

      PDF to Word converter

      You can now easily convert a PDF document into a Word document in just a couple of simple steps.
      Save the PDF document somewhere on your computer.
      1. Browse to find your PDF document.
      2. Click Upload and Convert Button.
      3. When the conversion is complete, click the Right-Click Here link (just a regular click works fine!)
      4. Click Open to view the Word document now, or Save to save the Word document to access later.
      5. Edit away!

      PDF to WordAnother great option is PDF to Word Converter. The only difference is that it emails the file to you. It took about 30 minutes for me to get the file, but if you're at a conference or away from your own computer and would prefer to get the documents later, give them a try!


      Blog Template by YummyLolly.com